No. 0095
Onix
Rock Snake Pokémon
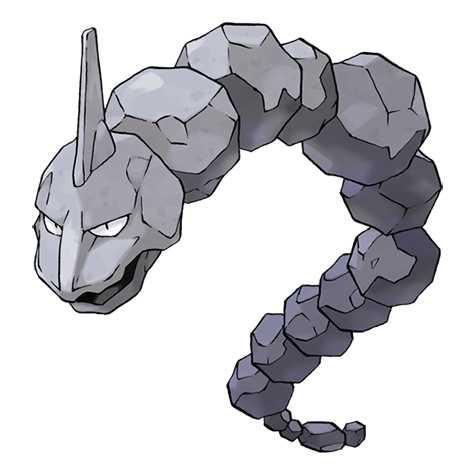
Turn it with the arrows or by dragging · pinch or scroll to zoom. Fan-made model from the Pokémon 3D API project.
Onix is a Rock/Ground-type Pokémon, 4× weak to Water and Grass and 2× weak to Fighting, Ground, Steel and Ice, with a base stat total of 385. It isn’t usable in Pokémon Champions’ Regulation M-C.
- Height
- 8.8 m 28′10″
- Weight
- 210 kg 463.0 lbs
- Base stat total
- 385 Higher than 36% of Pokémon
- Introduced
- Gen I Red & Green (JP)
This chain of immense stones resembles a giant serpent. Tremors shake the earth above as it burrows deep beneath the ground, feeding on boulders as it goes.
Base stats
Ranges in Pokémon Champions at Lv 50: 0 Stat Points with a −10% Stat Alignment to 32 Stat Points with a +10% one (HP has no alignment).Ranges in the main games at Lv 100: 0 IV/EV with a hindering nature to 31 IV/252 EV with a helpful nature. EV yield: 1 Def.
Stat calculatorChampions Stat Points & Stat Alignment, or EVs, IVs & nature
Type matchups
RockGroundshow which type causes itweaknessresistance
Weak to
Resists
Immune to
Takes normal damage from 6 types
Speed tiers
The faster Pokémon moves first each turn, so knowing who you outspeed decides a lot of battles. These are its Speed values at Lv 50 in Pokémon Champions (base Speed 70); Scarf and Tailwind use the Max+ value.
At max Speed, Onix outspeeds 13 of the 30 most used Pokémon in Champions VGC on Showdown.
 Mega Garchomp ZModest · 32 SP · #21 on Showdown
 Mega GengarTimid · 32 SP · #26 on Showdown
 Mega Raichu YTimid · 23 SP · #13 on Showdown
 Mega SalamenceTimid · 32 SP · #4 on Showdown
 WhimsicottTimid · 32 SP · #23 on Showdown
 Mega MetagrossJolly · 32 SP · #28 on Showdown
 Mega StaraptorJolly · 32 SP · #29 on Showdown
 SneaslerAdamant · 32 SP · #2 on Showdown
 Mega FloetteTimid · 32 SP · #17 on Showdown
 GarchompJolly · 32 SP · #19 on Showdown
 Mega Charizard YTimid · 32 SP · #14 on Showdown
 Mega GardevoirTimid · 32 SP · #20 on Showdown
 IndeedeeTimid · 32 SP · #30 on Showdown
 Hisuian ArcanineJolly · 32 SP · #16 on Showdown
 GholdengoTimid · 32 SP · #8 on Showdown
 BasculegionJolly · 32 SP · #6 on Showdown
 PelipperTimid · 32 SP · #12 on Showdown
 VolcaronaBold · 0 SP · #25 on Showdown
 RillaboomAdamant · 0 SP · #1 on Showdown
 MiloticCalm · 0 SP · #15 on Showdown
 SylveonModest · 15 SP · #18 on Showdown
 Female IndeedeeRelaxed · 0 SP · #7 on Showdown
 PolitoedCalm · 0 SP · #22 on Showdown
 SinistchaBold · 0 SP · #24 on Showdown
 ArmarougeQuiet · 0 SP · #27 on Showdown
 IncineroarCareful · 0 SP · #3 on Showdown
 FarigirafBold · 0 SP · #11 on Showdown
 KingambitAdamant · 0 SP · #5 on Showdown
 Mega GolisopodAdamant · 0 SP · #10 on Showdown
Smogon · Showdown Others at their most common Speed investment in Champions VGC (Reg M-C · Doubles, Sep 2026); Pokémon holding a Mega Stone are shown as their Mega.
Abilities
This Pokémon does not take damage besides Struggle/Life Orb/crash damage.
Everything about Rock Head →If this Pokémon is at full HP, it survives one hit with at least 1 HP. to .
Everything about Sturdy →Other Pokémon with Sturdy 42
 Geodude
 Graveler
 Golem
 Magnemite
 Magneton
 Sudowoodo
 Pineco
 Forretress
 Steelix
 Shuckle
 Skarmory
 Donphan
 Nosepass
 Aron
 Lairon
 Aggron
 Relicanth
 Regirock
 Shieldon
 Bastiodon
 Bonsly
 Magnezone
 Probopass
 Roggenrola
 Boldore
 Gigalith
 Sawk
 Dwebble
 Crustle
 Tirtouga
 Carracosta
 Tyrunt
 Carbink
 Bergmite
 Avalugg
 Togedemaru
 Cosmoem
 Nacli
 Naclstack
 Garganacl
 Cornerstone Mask Ogerpon
 Archaludon
If a physical attack hits this Pokémon, Defense is by 1, Speed is raised by 2.
Everything about Weak Armor →
 Hisuian Growlithe
 Cubone
 Marowak
 Rhyhorn
 Rhydon
 Aerodactyl
 Bagon
 Shelgon
 Blue-Striped Basculin
 Tyrantrum
 Omanyte
 Omastar
 Kabuto
 Kabutops
 Slugma
 Magcargo
 Galarian Corsola
 Garbodor
 Vanillite
 Vanillish
 Vanilluxe
 Vullaby
 Mandibuzz
 Sinistea
 Polteageist
 Cursola
 Ceruledge
Competitive
Smogon · Showdown On Showdown
Not used in the tracked Showdown formats this month.
Other Showdown formats Scarlet & Violet, with Tera
Evolution
 #0095OnixRockGround
 Trade holding Metal Coat#0208SteelixSteelGround
- Mega Evolution, in battle
 holding Steelixite
 #0208Mega SteelixSteelGround
Moves
Level up 7
| 1 | RolloutPower doubles with each hit. Repeats for 5 turns. | Rock | Phys | 30 | 90% | 20 |
|---|---|---|---|---|---|---|
| 6 | TackleNo additional effect. | Normal | Phys | 40 | 100% | 35 |
| 11 | Bulldoze100% chance lower adjacent Pkmn Speed by 1. | Ground | Phys | 60 | 100% | 20 |
| 18 | Rock Slide30% chance to make the foe(s) flinch. | Rock | Phys | 75 | 90% | 10 |
| 25 | Stealth RockHurts foes on switch-in. Factors Rock weakness. | Rock | Status | — | — | 20 |
| 34 | High HorsepowerNo additional effect. | Ground | Phys | 95 | 95% | 10 |
| 43 | Iron Tail30% chance to lower the target's Defense by 1. | Steel | Phys | 100 | 75% | 15 |
No moves match those filters.
Biology
It usually lives underground. As it grows, the stone portions of its body harden to become similar to a diamond, but colored black. Despite its large body being over 26 feet long, it can squirm its way through the ground at 50 mph.
As it digs through the ground, it eats hard objects, which makes its body more solid. Diglett may use the tunnels it burrows as homes. Onix has a magnet in its brain, which acts as a compass so that it does not lose direction while it is tunneling.
As it grows older, its body becomes increasingly rounder and smoother. It evolves into Steelix.
Adapted from Wikipedia: List of generation I Pokémon · CC BY-SA 4.0 · edited.
Polls & views
- Official vote, Japan#261 of 720 in the 2016 Pokémon General Election 720 (Japan)Official results, via Cinematoday
Each line is one source, as it published it. Polls counted every form under its species.
Pokédex entries
- Rock Snake Pokémon
- Kanto · Red & Green (JP)
- Color
- Gray
- Cave
- Pal Park area
- Mountain
This chain of immense stones resembles a giant serpent. Tremors shake the earth above as it burrows deep beneath the ground, feeding on boulders as it goes.
Legends: ArceusBurrows at high speed in search of food. The tunnels it leaves are used as homes by Diglett.
X · Let’s Go, Pikachu! · Let’s Go, Eevee!Opening its large mouth, it ingests massive amounts of soil and creates long tunnels.
Black 2 · White 2It burrows through the ground at a speed of 50 mph while feeding on large boulders.
Platinum · Black · WhiteIt squirms through the ground using its long and rugged body. It always eats while burrowing.
PearlWhen it travels underground, it causes rumbling and tremors. It can move at 50 mph.
DiamondAs it grows, the stone portions of its body harden to become similar to black-colored diamonds.
LeafGreenIt usually lives underground. It searches for food while boring its way through the ground at 50 miles per hour.
FireRed · YThere is a magnet in its brain that prevents an ONIX from losing direction while tunneling. As it grows older, its body becomes steadily rounder and smoother.
EmeraldONIX has a magnet in its brain. It acts as a compass so that this Pokémon does not lose direction while it is tunneling. As it grows older, its body becomes increasingly rounder and smoother.
Ruby · Sapphire · Omega Ruby · Alpha SapphireAs it digs through the ground, it absorbs many hard objects. This is what makes its body so solid.
Crystal · SwordIt rapidly bores through the ground at 50 mph by squirming and twisting its massive, rugged body.
Silver · SoulSilver · ShieldIt twists and squirms through the ground. The thunderous roar of its tunneling echoes a long way.
Gold · HeartGoldBurrows at high speed in search of food. The tunnels it leaves are used as homes by DIGLETTs.
YellowAs it grows, the stone portions of its body harden to become similar to a diamond, but colored black.
Red · Blue
Names around the world
- English
- Onix
- Japanese
- イワーク
- Japanese (romaji)
- Iwark
- Korean
- 롱스톤
- Chinese (Traditional)
- 大岩蛇
- Chinese (Simplified)
- 大岩蛇
- French
- Onix
- German
- Onix
- Spanish
- Onix
- Italian
- Onix
Sprites
Artwork and 3D models
Generation IX · animated models
Generation VIII · animated models
Gen VII · Gen VI · Gen V
Generation IV
Generation III
Generation II
Generation I
Training
- 1 Def
- 45 ≈5.9% with a Poké Ball at full HP
- 70
- 77
- Medium
Breeding
- Mineral
- ♂ 50%♀ 50%
- 25 egg cycles ≈6,630 steps (Gen IV–VII)
Where to find
Green 5 areas
- Rock Tunnel (B1F)Walking in tall grass or a cave · Lv 13–15
- Rock Tunnel (B2F)Walking in tall grass or a cave · Lv 13–17
- Victory Road 2 (1F)Walking in tall grass or a cave · Lv 36–42
- Victory Road 2 (2F)Walking in tall grass or a cave · Lv 36–42
- Victory Road 2 (3F)Walking in tall grass or a cave · Lv 42–45
Red 5 areas
- Rock Tunnel (B1F)Walking in tall grass or a cave · Lv 13–15
- Rock Tunnel (B2F)Walking in tall grass or a cave · Lv 13–17
- Victory Road 2 (1F)Walking in tall grass or a cave · Lv 36–42
- Victory Road 2 (2F)Walking in tall grass or a cave · Lv 36–42
- Victory Road 2 (3F)Walking in tall grass or a cave · Lv 42–45
Shield 14 areas
- Bridge Field (Max Den A)Catch a wild Dynamax or Gigantamax Pokémon in a Max Raid battle. · Lv 25–30
- Dusty Bowl (Max Den I)Catch a wild Dynamax or Gigantamax Pokémon in a Max Raid battle. · Lv 55–60
- East Lake AxewellWalking in tall grass or a cave · Lv 8–60
- Giant's SeatWalking in tall grass or a cave · Lv 30–60
- Giant's Seat (Max Den A)Catch a wild Dynamax or Gigantamax Pokémon in a Max Raid battle. · Lv 55–60
- Giant's Seat (Max Den B)Catch a wild Dynamax or Gigantamax Pokémon in a Max Raid battle. · Lv 35–60
- Giant's Seat (Max Den C)Catch a wild Dynamax or Gigantamax Pokémon in a Max Raid battle. · Lv 25–40
- Giant's Seat (Max Den E)Catch a wild Dynamax or Gigantamax Pokémon in a Max Raid battle. · Lv 25–40
- Hammerlocke Hills (Max Den B)Catch a wild Dynamax or Gigantamax Pokémon in a Max Raid battle. · Lv 25–40
- Motostoke RiverbankWalking in tall grass or a cave · Lv 26–60
- Rolling Fields (Main Area)Special overworld spawn in a fixed location. · Lv 26–60
- Rolling Fields (Max Den B)Catch a wild Dynamax or Gigantamax Pokémon in a Max Raid battle. · Lv 25–30
- Rolling Fields (Max Den H)Catch a wild Dynamax or Gigantamax Pokémon in a Max Raid battle. · Lv 35–60
- Stony Wilderness (Max Den L)Catch a wild Dynamax or Gigantamax Pokémon in a Max Raid battle. · Lv 35–60
Sword 14 areas
- Bridge Field (Max Den A)Catch a wild Dynamax or Gigantamax Pokémon in a Max Raid battle. · Lv 25–30
- Dusty Bowl (Max Den I)Catch a wild Dynamax or Gigantamax Pokémon in a Max Raid battle. · Lv 35–60
- East Lake AxewellWalking in tall grass or a cave · Lv 8–60
- Giant's SeatWalking in tall grass or a cave · Lv 30–60
- Giant's Seat (Max Den A)Catch a wild Dynamax or Gigantamax Pokémon in a Max Raid battle. · Lv 35–60
- Giant's Seat (Max Den B)Catch a wild Dynamax or Gigantamax Pokémon in a Max Raid battle. · Lv 35–60
- Giant's Seat (Max Den C)Catch a wild Dynamax or Gigantamax Pokémon in a Max Raid battle. · Lv 25–40
- Giant's Seat (Max Den E)Catch a wild Dynamax or Gigantamax Pokémon in a Max Raid battle. · Lv 25–40
- Hammerlocke Hills (Max Den B)Catch a wild Dynamax or Gigantamax Pokémon in a Max Raid battle. · Lv 25–40
- Motostoke RiverbankWalking in tall grass or a cave · Lv 26–60
- Rolling Fields (Main Area)Special overworld spawn in a fixed location. · Lv 26–60
- Rolling Fields (Max Den B)Catch a wild Dynamax or Gigantamax Pokémon in a Max Raid battle. · Lv 25–30
- Rolling Fields (Max Den H)Catch a wild Dynamax or Gigantamax Pokémon in a Max Raid battle. · Lv 35–60
- Stony Wilderness (Max Den L)Catch a wild Dynamax or Gigantamax Pokémon in a Max Raid battle. · Lv 35–60
Let’s Go, Eevee! 8 areas
- Mount Moon (1F)Walking in the overworld · Lv 5–10
- Mount Moon (B1F)Walking in the overworld · Lv 5–10
- Mount Moon (B2F)Walking in the overworld · Lv 5–10
- Rock Tunnel (1F)Walking in the overworld · Lv 18–23
- Rock Tunnel (B1F)Walking in the overworld · Lv 18–23
- Victory Road 1 (1F)Walking in the overworld · Lv 41–46
- Victory Road 1 (2F)Walking in the overworld · Lv 41–46
- Victory Road 1 (3F)Walking in the overworld · Lv 41–46
Let’s Go, Pikachu! 8 areas
- Mount Moon (1F)Walking in the overworld · Lv 5–10
- Mount Moon (B1F)Walking in the overworld · Lv 5–10
- Mount Moon (B2F)Walking in the overworld · Lv 5–10
- Rock Tunnel (1F)Walking in the overworld · Lv 18–23
- Rock Tunnel (B1F)Walking in the overworld · Lv 18–23
- Victory Road 1 (1F)Walking in the overworld · Lv 41–46
- Victory Road 1 (2F)Walking in the overworld · Lv 41–46
- Victory Road 1 (3F)Walking in the overworld · Lv 41–46
Ultra Moon 1 area
- Ten Carat HillIsland Scan · Lv 14
Ultra Sun 1 area
- Ten Carat HillIsland Scan · Lv 14
Alpha Sapphire 2 areas
- Mirage Cave (North of Fortree)Walking in tall grass or a cave · Lv 36–38
- Mirage Cave (South East of Route 129)Walking in tall grass or a cave · Lv 36–38
Omega Ruby 2 areas
- Mirage Cave (North of Fortree)Walking in tall grass or a cave · Lv 36–38
- Mirage Cave (South East of Route 129)Walking in tall grass or a cave · Lv 36–38
Y 3 areas
- Friend Safari (Rock)Walking in tall grass or a cave · Lv 30
- Glittering Cave (unknown area 303)Walking in tall grass or a cave · Lv 17
- Glittering Cave (unknown area 304)Smashing rocks · Lv 15–17
X 4 areas
- Cyllage CitySmashing rocks · Lv 15–17
- Friend Safari (Rock)Walking in tall grass or a cave · Lv 30
- Glittering Cave (unknown area 303)Walking in tall grass or a cave · Lv 17
- Glittering Cave (unknown area 304)Smashing rocks · Lv 15–17
White 2 13 areas
- Clay TunnelWalking in dust clouds, Walking in tall grass or a cave · Lv 54–57
- Glacier RoomWalking in dust clouds, Walking in tall grass or a cave · Lv 54–57
- Iron RoomWalking in dust clouds, Walking in tall grass or a cave · Lv 54–57
- Relic Tunnel (Castelia Sewers entrance)Walking in dust clouds, Walking in tall grass or a cave · Lv 16–18
- Relic Tunnel (PWT entrance)Walking in dust clouds, Walking in tall grass or a cave · Lv 27–30
- Relic Tunnel (Relic Castle entrance)Walking in dust clouds, Walking in tall grass or a cave · Lv 27–30
- Rocky Mountain RoomWalking in dust clouds, Walking in tall grass or a cave · Lv 54–57
- Twist MountainWalking in dust clouds, Walking in tall grass or a cave · Lv 54–57
- Underground RuinsWalking in dust clouds, Walking in tall grass or a cave · Lv 54–57
- Victory Road 2 (unknown area 74)Walking in dust clouds, Walking in tall grass or a cave · Lv 41–44
- Victory Road 2 (unknown area 75)Walking in dust clouds, Walking in tall grass or a cave · Lv 47–50
- Victory Road 2 (unknown area 77)Walking in dust clouds · Lv 47
- Victory Road 2 (unknown area 80)Walking in dust clouds · Lv 47
Black 2 13 areas
- Clay TunnelWalking in dust clouds, Walking in tall grass or a cave · Lv 54–57
- Glacier RoomWalking in dust clouds, Walking in tall grass or a cave · Lv 54–57
- Iron RoomWalking in dust clouds, Walking in tall grass or a cave · Lv 54–57
- Relic Tunnel (Castelia Sewers entrance)Walking in dust clouds, Walking in tall grass or a cave · Lv 16–18
- Relic Tunnel (PWT entrance)Walking in dust clouds, Walking in tall grass or a cave · Lv 27–30
- Relic Tunnel (Relic Castle entrance)Walking in dust clouds, Walking in tall grass or a cave · Lv 27–30
- Rocky Mountain RoomWalking in dust clouds, Walking in tall grass or a cave · Lv 54–57
- Twist MountainWalking in dust clouds, Walking in tall grass or a cave · Lv 54–57
- Underground RuinsWalking in dust clouds, Walking in tall grass or a cave · Lv 54–57
- Victory Road 2 (unknown area 74)Walking in dust clouds, Walking in tall grass or a cave · Lv 41–44
- Victory Road 2 (unknown area 75)Walking in dust clouds, Walking in tall grass or a cave · Lv 47–50
- Victory Road 2 (unknown area 77)Walking in dust clouds · Lv 47
- Victory Road 2 (unknown area 80)Walking in dust clouds · Lv 47
White 1 area
- Relic Castle (C)Walking in tall grass or a cave · Lv 48–49
Black 1 area
- Relic Castle (C)Walking in tall grass or a cave · Lv 48–49
SoulSilver 12 areas
- Mount Silver (1F)Walking in tall grass or a cave · Lv 42
- Mount Silver (mountainside)Walking in tall grass or a cave · Lv 48
- Road 47 (inside cave)Walking in tall grass or a cave · Lv 20
- Rock Tunnel (B1F)Walking in tall grass or a cave · Lv 16
- Safari Zone WastelandWalking in tall grass or a cave · Lv 15–17
- Union Cave (1F)Walking in tall grass or a cave · Lv 6
- Union Cave (B1F)Walking in tall grass or a cave · Lv 8
- Union Cave (B2F)Walking in tall grass or a cave · Lv 23
- Victory Road 1 (1F)Walking in tall grass or a cave · Lv 34–36
- Victory Road 1 (2F)Walking in tall grass or a cave · Lv 34–36
- Victory Road 1 (3F)Walking in tall grass or a cave · Lv 34–36
- Violet CityTrade with an NPC · Lv 1–100
HeartGold 12 areas
- Mount Silver (1F)Walking in tall grass or a cave · Lv 42
- Mount Silver (mountainside)Walking in tall grass or a cave · Lv 48
- Road 47 (inside cave)Walking in tall grass or a cave · Lv 20
- Rock Tunnel (B1F)Walking in tall grass or a cave · Lv 16
- Safari Zone WastelandWalking in tall grass or a cave · Lv 15–17
- Union Cave (1F)Walking in tall grass or a cave · Lv 6
- Union Cave (B1F)Walking in tall grass or a cave · Lv 8
- Union Cave (B2F)Walking in tall grass or a cave · Lv 23
- Victory Road 1 (1F)Walking in tall grass or a cave · Lv 34–36
- Victory Road 1 (2F)Walking in tall grass or a cave · Lv 34–36
- Victory Road 1 (3F)Walking in tall grass or a cave · Lv 34–36
- Violet CityTrade with an NPC · Lv 1–100
Platinum 15 areas
- Iron Island (1F)Walking in tall grass or a cave · Lv 31–33
- Iron Island (B1F left)Walking in tall grass or a cave · Lv 31–33
- Iron Island (B1F right)Walking in tall grass or a cave · Lv 31–33
- Iron Island (B2F left)Walking in tall grass or a cave · Lv 32
- Iron Island (B2F right)Walking in tall grass or a cave · Lv 32
- Iron Island (B3F)Walking in tall grass or a cave · Lv 32
- Oreburgh mine (1F)Walking in tall grass or a cave · Lv 6–8
- Oreburgh mine (B1F)Walking in tall grass or a cave · Lv 7–9
- Victory Road (1F)Walking in tall grass or a cave · Lv 41–42
- Victory Road (2F)Walking in tall grass or a cave · Lv 42
- Victory Road (B1F)Walking in tall grass or a cave · Lv 42
- Victory Road (inside exit)Walking in tall grass or a cave · Lv 48–50
- Victory Road (inside)Walking in tall grass or a cave · Lv 48–50
- Wayward Cave (1F)Walking in tall grass or a cave · Lv 18–20
- Wayward Cave (B1F)Walking in tall grass or a cave · Lv 18–20
Pearl 18 areas
- Iron Island (1F)Walking in tall grass or a cave · Lv 32–33
- Iron Island (B1F left)Walking in tall grass or a cave · Lv 32–33
- Iron Island (B1F right)Walking in tall grass or a cave · Lv 32–33
- Iron Island (B2F left)Walking in tall grass or a cave · Lv 32–33
- Iron Island (B2F right)Walking in tall grass or a cave · Lv 31–33
- Iron Island (B3F)Walking in tall grass or a cave · Lv 32–33
- Oreburgh mine (1F)Walking in tall grass or a cave · Lv 8
- Oreburgh mine (B1F)Walking in tall grass or a cave · Lv 9
- Snowpoint Temple (1F)Walking in tall grass or a cave · Lv 50–52
- Snowpoint Temple (B1F)Walking in tall grass or a cave · Lv 52–53
- Snowpoint Temple (B2F)Walking in tall grass or a cave · Lv 52–53
- Snowpoint Temple (B3F)Walking in tall grass or a cave · Lv 52–53
- Stark Mountain entranceWalking in tall grass or a cave · Lv 54
- Stark Mountain main cavernWalking in tall grass or a cave · Lv 56
- Victory Road (1F)Walking in tall grass or a cave · Lv 44
- Victory Road (2F)Walking in tall grass or a cave · Lv 45
- Victory Road (inside exit)Walking in tall grass or a cave · Lv 50
- Victory Road (inside)Walking in tall grass or a cave · Lv 50
Diamond 18 areas
- Iron Island (1F)Walking in tall grass or a cave · Lv 32–33
- Iron Island (B1F left)Walking in tall grass or a cave · Lv 32–33
- Iron Island (B1F right)Walking in tall grass or a cave · Lv 32–33
- Iron Island (B2F left)Walking in tall grass or a cave · Lv 32–33
- Iron Island (B2F right)Walking in tall grass or a cave · Lv 31–33
- Iron Island (B3F)Walking in tall grass or a cave · Lv 32–33
- Oreburgh mine (1F)Walking in tall grass or a cave · Lv 8
- Oreburgh mine (B1F)Walking in tall grass or a cave · Lv 9
- Snowpoint Temple (1F)Walking in tall grass or a cave · Lv 50–52
- Snowpoint Temple (B1F)Walking in tall grass or a cave · Lv 52–53
- Snowpoint Temple (B2F)Walking in tall grass or a cave · Lv 52–53
- Snowpoint Temple (B3F)Walking in tall grass or a cave · Lv 52–53
- Stark Mountain entranceWalking in tall grass or a cave · Lv 54
- Stark Mountain main cavernWalking in tall grass or a cave · Lv 56
- Victory Road (1F)Walking in tall grass or a cave · Lv 44
- Victory Road (2F)Walking in tall grass or a cave · Lv 45
- Victory Road (inside exit)Walking in tall grass or a cave · Lv 50
- Victory Road (inside)Walking in tall grass or a cave · Lv 50
LeafGreen 6 areas
- Rock Tunnel (1F)Walking in tall grass or a cave · Lv 13–15
- Rock Tunnel (B1F)Walking in tall grass or a cave · Lv 13–17
- Sevault CanyonWalking in tall grass or a cave · Lv 54
- Victory Road 2 (1F)Walking in tall grass or a cave · Lv 40–46
- Victory Road 2 (2F)Walking in tall grass or a cave · Lv 45–48
- Victory Road 2 (3F)Walking in tall grass or a cave · Lv 40–46
FireRed 6 areas
- Rock Tunnel (1F)Walking in tall grass or a cave · Lv 13–15
- Rock Tunnel (B1F)Walking in tall grass or a cave · Lv 13–17
- Sevault CanyonWalking in tall grass or a cave · Lv 54
- Victory Road 2 (1F)Walking in tall grass or a cave · Lv 40–46
- Victory Road 2 (2F)Walking in tall grass or a cave · Lv 45–48
- Victory Road 2 (3F)Walking in tall grass or a cave · Lv 40–46
Crystal 10 areas
- Mount Silver (1F)Walking in tall grass or a cave · Lv 42
- Mount Silver (top)Walking in tall grass or a cave · Lv 48
- Rock Tunnel (B1F)Walking in tall grass or a cave · Lv 16
- Union Cave (1F)Walking in tall grass or a cave · Lv 6
- Union Cave (B1F)Walking in tall grass or a cave · Lv 8
- Union Cave (B2F)Walking in tall grass or a cave · Lv 23
- Victory Road 1 (1F)Walking in tall grass or a cave · Lv 32–33
- Victory Road 1 (2F)Walking in tall grass or a cave · Lv 32–33
- Victory Road 1 (3F)Walking in tall grass or a cave · Lv 32–33
- Violet City (Southwest House)Trade with an NPC · Lv 5–100
Silver 10 areas
- Mount Silver (1F)Walking in tall grass or a cave · Lv 42
- Mount Silver (top)Walking in tall grass or a cave · Lv 48
- Rock Tunnel (B1F)Walking in tall grass or a cave · Lv 16
- Union Cave (1F)Walking in tall grass or a cave · Lv 6
- Union Cave (B1F)Walking in tall grass or a cave · Lv 8
- Union Cave (B2F)Walking in tall grass or a cave · Lv 23
- Victory Road 1 (1F)Walking in tall grass or a cave · Lv 34–36
- Victory Road 1 (2F)Walking in tall grass or a cave · Lv 34–36
- Victory Road 1 (3F)Walking in tall grass or a cave · Lv 34–36
- Violet City (Southwest House)Trade with an NPC · Lv 3–100
Gold 10 areas
- Mount Silver (1F)Walking in tall grass or a cave · Lv 42
- Mount Silver (top)Walking in tall grass or a cave · Lv 48
- Rock Tunnel (B1F)Walking in tall grass or a cave · Lv 16
- Union Cave (1F)Walking in tall grass or a cave · Lv 6
- Union Cave (B1F)Walking in tall grass or a cave · Lv 8
- Union Cave (B2F)Walking in tall grass or a cave · Lv 23
- Victory Road 1 (1F)Walking in tall grass or a cave · Lv 34–36
- Victory Road 1 (2F)Walking in tall grass or a cave · Lv 34–36
- Victory Road 1 (3F)Walking in tall grass or a cave · Lv 34–36
- Violet City (Southwest House)Trade with an NPC · Lv 3–100
Yellow 4 areas
- Rock Tunnel (B2F)Walking in tall grass or a cave · Lv 14–22
- Victory Road 2 (1F)Walking in tall grass or a cave · Lv 43–45
- Victory Road 2 (2F)Walking in tall grass or a cave · Lv 45–47
- Victory Road 2 (3F)Walking in tall grass or a cave · Lv 49
Blue 5 areas
- Rock Tunnel (B1F)Walking in tall grass or a cave · Lv 13–15
- Rock Tunnel (B2F)Walking in tall grass or a cave · Lv 13–17
- Victory Road 2 (1F)Walking in tall grass or a cave · Lv 36–42
- Victory Road 2 (2F)Walking in tall grass or a cave · Lv 36–42
- Victory Road 2 (3F)Walking in tall grass or a cave · Lv 42–45
Red 5 areas
- Rock Tunnel (B1F)Walking in tall grass or a cave · Lv 13–15
- Rock Tunnel (B2F)Walking in tall grass or a cave · Lv 13–17
- Victory Road 2 (1F)Walking in tall grass or a cave · Lv 36–42
- Victory Road 2 (2F)Walking in tall grass or a cave · Lv 36–42
- Victory Road 2 (3F)Walking in tall grass or a cave · Lv 42–45
Locations cover Red & Blue to Sword & Shield (with its DLC) and Let’s Go. We don’t have them yet for Legends: Arceus, Brilliant Diamond & Shining Pearl, Scarlet & Violet and Legends: Z-A.