No. 0118
Goldeen
Goldfish Pokémon
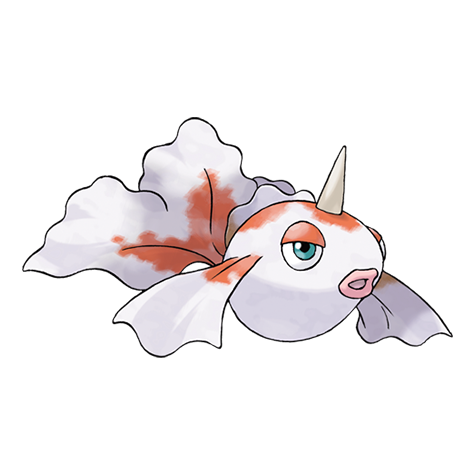
Turn it with the arrows or by dragging · pinch or scroll to zoom. Fan-made model from the Pokémon 3D API project.
Goldeen is a Water-type Pokémon, 2× weak to Grass and Electric, with a base stat total of 320. It isn’t usable in Pokémon Champions’ Regulation M-C.
- Height
- 0.6 m 2′00″
- Weight
- 15 kg 33.1 lbs
- Base stat total
- 320 Higher than 23% of Pokémon
- Introduced
- Gen I Red & Green (JP)
Its dorsal and pectoral fins are strongly developed like muscles. It can swim at a speed of five knots.
Base stats
Ranges in Pokémon Champions at Lv 50: 0 Stat Points with a −10% Stat Alignment to 32 Stat Points with a +10% one (HP has no alignment).Ranges in the main games at Lv 100: 0 IV/EV with a hindering nature to 31 IV/252 EV with a helpful nature. EV yield: 1 Atk.
Stat calculatorChampions Stat Points & Stat Alignment, or EVs, IVs & nature
Type matchups
Weak to
Resists
Takes normal damage from 12 types
With : Electric becomes 0×
Speed tiers
The faster Pokémon moves first each turn, so knowing who you outspeed decides a lot of battles. These are its Speed values at Lv 50 in Pokémon Champions (base Speed 63); Scarf and Tailwind use the Max+ value.
At max Speed, Goldeen outspeeds 12 of the 30 most used Pokémon in Champions VGC on Showdown.
 Mega Garchomp ZModest · 32 SP · #21 on Showdown
 Mega GengarTimid · 32 SP · #26 on Showdown
 Mega Raichu YTimid · 23 SP · #13 on Showdown
 Mega SalamenceTimid · 32 SP · #4 on Showdown
 WhimsicottTimid · 32 SP · #23 on Showdown
 Mega MetagrossJolly · 32 SP · #28 on Showdown
 Mega StaraptorJolly · 32 SP · #29 on Showdown
 SneaslerAdamant · 32 SP · #2 on Showdown
 Mega FloetteTimid · 32 SP · #17 on Showdown
 GarchompJolly · 32 SP · #19 on Showdown
 Mega Charizard YTimid · 32 SP · #14 on Showdown
 Mega GardevoirTimid · 32 SP · #20 on Showdown
 IndeedeeTimid · 32 SP · #30 on Showdown
 Hisuian ArcanineJolly · 32 SP · #16 on Showdown
 ArchaludonTimid · 32 SP · #9 on Showdown
 GholdengoTimid · 32 SP · #8 on Showdown
 PelipperTimid · 32 SP · #12 on Showdown
 VolcaronaBold · 0 SP · #25 on Showdown
 RillaboomAdamant · 0 SP · #1 on Showdown
 MiloticCalm · 0 SP · #15 on Showdown
 SylveonModest · 15 SP · #18 on Showdown
 Female IndeedeeRelaxed · 0 SP · #7 on Showdown
 PolitoedCalm · 0 SP · #22 on Showdown
 SinistchaBold · 0 SP · #24 on Showdown
 ArmarougeQuiet · 0 SP · #27 on Showdown
 IncineroarCareful · 0 SP · #3 on Showdown
 FarigirafBold · 0 SP · #11 on Showdown
 KingambitAdamant · 0 SP · #5 on Showdown
 Mega GolisopodAdamant · 0 SP · #10 on Showdown
Smogon · Showdown Others at their most common Speed investment in Champions VGC (Reg M-C · Doubles, Sep 2026); Pokémon holding a Mega Stone are shown as their Mega.
Abilities
If is active, this Pokémon's Speed is doubled.
Everything about Swift Swim →Other Pokémon with Swift Swim 44
 Psyduck
 Golduck
 Poliwag
 Poliwhirl
 Poliwrath
 Horsea
 Seaking
 Magikarp
 Omanyte
 Omastar
 Kabuto
 Kabutops
 Qwilfish
 Mantine
 Kingdra
 Mega Swampert
 Lotad
 Lombre
 Ludicolo
 Surskit
 Anorith
 Armaldo
 Feebas
 Huntail
 Gorebyss
 Relicanth
 Luvdisc
 Buizel
 Floatzel
 Finneon
 Lumineon
 Mantyke
 Tympole
 Palpitoad
 Seismitoad
 Tirtouga
 Carracosta
 Beartic
 Chewtle
 Drednaw
 Arrokuda
 Barraskewda
 Basculegion
 Overqwil
This Pokémon cannot be . Gaining this Ability while burned cures it.
Everything about Water Veil →This Pokémon draws Electric moves to itself to raise Sp. Atk by 1; Electric .
Everything about Lightning Rod →
 Wailmer
 Wailord
 Finizen
 Dondozo
 Pikachu
 Raichu
 Cubone
 Marowak
 Rhyhorn
 Rhydon
 Pichu
 Mega Sceptile
 Electrike
 Manectric
 Plusle
 Rhyperior
 Blitzle
 Zebstrika
 Togedemaru
 Pincurchin
Competitive
Smogon · Showdown On Showdown
Not used in the tracked Showdown formats this month.
Other Showdown formats Scarlet & Violet, with Tera
Evolution

Moves
Level up 12
| 1 | PeckNo additional effect. | Phys | 35 | 100% | 35 | |
|---|---|---|---|---|---|---|
| 1 | Tail WhipLowers the foe(s) Defense by 1. | Normal | Status | — | 100% | 30 |
| 5 | SupersonicCauses the target to become confused. | Normal | Status | — | 55% | 20 |
| 10 | Water Pulse20% chance to confuse the target. | Water | Spec | 60 | 100% | 20 |
| 15 | Horn AttackNo additional effect. | Normal | Phys | 65 | 100% | 25 |
| 20 | AgilityRaises the user's Speed by 2. | Psychic | Status | — | — | 30 |
| 25 | Aqua RingUser recovers 1/16 max HP per turn. | Water | Status | — | — | 20 |
| 30 | FlailMore power the less HP the user has left. | Normal | Phys | — | 100% | 15 |
| 35 | Waterfall20% chance to make the target flinch. | Water | Phys | 80 | 100% | 15 |
| 40 | SoakChanges the target's type to Water. | Water | Status | — | 100% | 20 |
| 45 | MegahornNo additional effect. | Bug | Phys | 120 | 85% | 10 |
| 50 | Horn DrillOHKOs the target. Fails if user is a lower level. | Normal | Phys | — | 30% | 5 |
TM / HM / TR 19
| TM49 | Scald30% chance to burn the target. Thaws target. | Water | Spec | 80 | 100% | 15 |
|---|---|---|---|---|---|---|
| HM03 | SurfHits adjacent Pokémon. Double damage on Dive. | Water | Spec | 90 | 100% | 15 |
| HM07 | Waterfall20% chance to make the target flinch. | Water | Phys | 80 | 100% | 15 |
| TM | Swords DanceRaises the user's Attack by 2. | Normal | Status | — | — | 20 |
| TM | Ice Beam10% chance to freeze the target. | Ice | Spec | 90 | 100% | 10 |
| TM | Blizzard10% chance to freeze foe(s). Can't miss in Snow. | Ice | Spec | 110 | 70% | 5 |
| TM | Double TeamRaises the user's evasiveness by 1. | Normal | Status | — | — | 15 |
| TM | RestUser sleeps 2 turns and restores HP and status. | Psychic | Status | — | — | 5 |
| TM | SubstituteUser takes 1/4 its max HP to put in a substitute. | Normal | Status | — | — | 10 |
| TM | ProtectPrevents moves from affecting the user this turn. | Normal | Status | — | — | 10 |
| TM | EndureUser survives attacks this turn with at least 1 HP. | Normal | Status | — | — | 10 |
| TM | SwaggerRaises the target's Attack by 2 and confuses it. | Normal | Status | — | 85% | 15 |
| TM | AttractA target of the opposite gender gets infatuated. | Normal | Status | — | 100% | 15 |
| TM | Sleep TalkUser must be asleep. Uses another known move. | Normal | Status | — | — | 10 |
| TM | Rain DanceFor 5 turns, heavy rain powers Water moves. | Water | Status | — | — | 5 |
| TM | HailFor 5 turns, hail crashes down. | Ice | Status | — | — | 10 |
| TM | FacadePower doubles if user is burn/poison/paralyzed. | Normal | Phys | 70 | 100% | 20 |
| TM | Water Pulse20% chance to confuse the target. | Water | Spec | 60 | 100% | 20 |
| TM | Poison Jab30% chance to poison the target. | Poison | Phys | 80 | 100% | 20 |
Egg moves 9
| Egg | AcupressureRaises a random stat of the user or an ally by 2. | Normal | Status | — | — | 30 |
|---|---|---|---|---|---|---|
| Egg | Aqua TailNo additional effect. | Water | Phys | 90 | 90% | 10 |
| Egg | Body Slam30% chance to paralyze the target. | Normal | Phys | 85 | 100% | 15 |
| Egg | HazeEliminates all stat changes. | Ice | Status | — | — | 30 |
| Egg | Hydro PumpNo additional effect. | Water | Spec | 110 | 80% | 5 |
| Egg | Mud Shot100% chance to lower the target's Speed by 1. | Ground | Spec | 55 | 95% | 15 |
| Egg | Mud-Slap100% chance to lower the target's accuracy by 1. | Ground | Spec | 20 | 100% | 10 |
| Egg | Psybeam10% chance to confuse the target. | Psychic | Spec | 65 | 100% | 20 |
| Egg | Skull BashRaises user's Defense by 1 on turn 1. Hits turn 2. | Normal | Phys | 130 | 100% | 10 |
No moves match those filters.
Biology
If kept in an aquarium, Goldeen will use its horn to break out. Swimmers have to be careful in water, so that Goldeen do not ram into them.
Design & origin
Goldeen and Seaking are based on goldfish. Goldeen was originally intended to have a pre-evolution called "Gyopin", but it was cut from the game due to a lack of cartridge space.
Adapted from Wikipedia: List of generation I Pokémon · CC BY-SA 4.0 · edited.
Polls & views
- Official vote, Japan#580 of 720 in the 2016 Pokémon General Election 720 (Japan), tiedOfficial results, via Cinematoday
Each line is one source, as it published it. Polls counted every form under its species.
Pokédex entries
- Goldfish Pokémon
- Kanto · Red & Green (JP)
- Color
- Red
- Water's Edge
- Pal Park area
- Pond
The way it swims along fluttering its dress-like fins has earned it the name “princess of the water.”
Ultra MoonAlthough known for their splendid tail fins, Goldeen apparently compete among themselves to see whose horn is thickest and sharpest.
Ultra SunSpellbound by the length of its horn and the beauty of its fins, many strange Trainers raise Goldeen and nothing but Goldeen.
MoonWhen the weather grows warm, they form groups and swim upriver. This sight serves as a poetic reminder that spring has arrived.
SunA strong swimmer, it is capable of swimming nonstop up fast streams at a steady speed of five knots per hour.
SoulSilverThough it appears very elegant when swimming with fins unfurled, it can jab powerfully with its horn.
Platinum · Black · White · Black 2 · White 2It swims at a steady 5 knots. If it senses danger, it will strike back with its sharp horn.
Pearl · XIt swims elegantly by flittering its tail fin as if it were a dress. It has the look of a queen.
DiamondIts dorsal and pectoral fins are strongly developed like muscles. It can swim at a speed of five knots.
FireRed · ShieldIn the springtime, schools of GOLDEEN can be seen swimming up falls and rivers. It metes out staggering damage with its single horn.
EmeraldGOLDEEN loves swimming wild and free in rivers and ponds. If one of these Pokémon is placed in an aquarium, it will shatter even the thickest glass with one ram of its horn and make its escape.
Sapphire · Alpha SapphireGOLDEEN is a very beautiful Pokémon with fins that billow elegantly in water. However, don’t let your guard down around this Pokémon - it could ram you powerfully with its horn.
Ruby · Omega RubyDuring spawning season, they swim gracefully in the water, searching for their perfect mate.
CrystalA strong swimmer, it is capable of swimming nonstop up fast streams at a steady speed of five knots.
SilverIts dorsal, pectoral and tail fins wave elegantly in water. That is why it is known as the water dancer.
Gold · HeartGold · Y · SwordWhen it is time for them to lay eggs, they can be seen swimming up rivers and falls in large groups.
Yellow · Let’s Go, Pikachu! · Let’s Go, Eevee!Its tail fin billows like an elegant ballroom dress, giving it the nickname of the Water Queen.
Red · Blue · LeafGreen
Names around the world
- English
- Goldeen
- Japanese
- トサキント
- Japanese (romaji)
- Tosakinto
- Korean
- 콘치
- Chinese (Traditional)
- 角金魚
- Chinese (Simplified)
- 角金鱼
- French
- Poissirène
- German
- Goldini
- Spanish
- Goldeen
- Italian
- Goldeen
Sprites
Artwork and 3D models
Gen VIII · Gen VII · Gen VI · Gen V
Generation IV
Generation III
Generation II
Generation I
Training
- 1 Atk
- 225 ≈29.4% with a Poké Ball at full HP
- 70
- 64
- Medium
Breeding
- Water 2
- ♂ 50%♀ 50%
- 20 egg cycles ≈5,355 steps (Gen IV–VII)
Males and females look different


Where to find
Shield: The Isle of Armor 4 areas
- Courageous Cavern (Max Den E)Catch a wild Dynamax or Gigantamax Pokémon in a Max Raid battle. · Lv 25–40
- Fields of Honor (Max Den G)Catch a wild Dynamax or Gigantamax Pokémon in a Max Raid battle. · Lv 25–40
- Forest of FocusFishing at bubbling spots in the water · Lv 13–60
- Soothing Wetlands (Max Den I)Catch a wild Dynamax or Gigantamax Pokémon in a Max Raid battle. · Lv 25–40
Green 30 areas
- Celadon CityFishing with a Good Rod · Lv 10
- Cerulean Cave (1F)Fishing with a Good Rod · Lv 10
- Cerulean Cave (B1F)Fishing with a Good Rod · Lv 10
- Cerulean CityFishing with a Good Rod, Fishing with a Super Rod · Lv 10–15
- Cinnabar IslandFishing with a Good Rod, Fishing with a Super Rod · Lv 10–15
- Fuchsia CityFishing with a Good Rod, Fishing with a Super Rod · Lv 10–15
- Pallet TownFishing with a Good Rod · Lv 10
- Road 10Fishing with a Good Rod · Lv 10
- Road 11Fishing with a Good Rod · Lv 10
- Road 12Fishing with a Good Rod, Fishing with a Super Rod · Lv 10–15
- Road 13Fishing with a Good Rod, Fishing with a Super Rod · Lv 10–15
- Road 17Fishing with a Good Rod, Fishing with a Super Rod · Lv 10–15
- Road 18Fishing with a Good Rod, Fishing with a Super Rod · Lv 10–15
- Road 19Fishing with a Good Rod, Fishing with a Super Rod · Lv 10–15
- Road 20Fishing with a Good Rod, Fishing with a Super Rod · Lv 10–15
- Road 21Fishing with a Good Rod, Fishing with a Super Rod · Lv 10–15
- Road 22Fishing with a Good Rod, Fishing with a Super Rod · Lv 10–15
- Road 23Fishing with a Good Rod · Lv 10
- Road 24Fishing with a Good Rod, Fishing with a Super Rod · Lv 10–15
- Road 25Fishing with a Good Rod, Fishing with a Super Rod · Lv 10–15
- Road 6Fishing with a Good Rod · Lv 10
- S.S. Anne dockFishing with a Good Rod · Lv 10
- Safari Zone (Area 1, east)Fishing with a Good Rod · Lv 10
- Safari Zone (Area 2, north)Fishing with a Good Rod · Lv 10
- Safari Zone (Area 3, west)Fishing with a Good Rod · Lv 10
- Safari Zone (middle)Fishing with a Good Rod · Lv 10
- Seafoam Islands (B3F)Fishing with a Good Rod, Fishing with a Super Rod · Lv 10–15
- Seafoam Islands (B4F)Fishing with a Good Rod, Fishing with a Super Rod · Lv 10–15
- Vermilion CityFishing with a Good Rod · Lv 10
- Viridian CityFishing with a Good Rod · Lv 10
Red 30 areas
- Celadon CityFishing with a Good Rod · Lv 10
- Cerulean Cave (1F)Fishing with a Good Rod · Lv 10
- Cerulean Cave (B1F)Fishing with a Good Rod · Lv 10
- Cerulean CityFishing with a Good Rod, Fishing with a Super Rod · Lv 10–15
- Cinnabar IslandFishing with a Good Rod, Fishing with a Super Rod · Lv 10–15
- Fuchsia CityFishing with a Good Rod, Fishing with a Super Rod · Lv 10–15
- Pallet TownFishing with a Good Rod · Lv 10
- Road 10Fishing with a Good Rod · Lv 10
- Road 11Fishing with a Good Rod · Lv 10
- Road 12Fishing with a Good Rod, Fishing with a Super Rod · Lv 10–15
- Road 13Fishing with a Good Rod, Fishing with a Super Rod · Lv 10–15
- Road 17Fishing with a Good Rod, Fishing with a Super Rod · Lv 10–15
- Road 18Fishing with a Good Rod, Fishing with a Super Rod · Lv 10–15
- Road 19Fishing with a Good Rod, Fishing with a Super Rod · Lv 10–15
- Road 20Fishing with a Good Rod, Fishing with a Super Rod · Lv 10–15
- Road 21Fishing with a Good Rod, Fishing with a Super Rod · Lv 10–15
- Road 22Fishing with a Good Rod, Fishing with a Super Rod · Lv 10–15
- Road 23Fishing with a Good Rod · Lv 10
- Road 24Fishing with a Good Rod, Fishing with a Super Rod · Lv 10–15
- Road 25Fishing with a Good Rod, Fishing with a Super Rod · Lv 10–15
- Road 6Fishing with a Good Rod · Lv 10
- S.S. Anne dockFishing with a Good Rod · Lv 10
- Safari Zone (Area 1, east)Fishing with a Good Rod · Lv 10
- Safari Zone (Area 2, north)Fishing with a Good Rod · Lv 10
- Safari Zone (Area 3, west)Fishing with a Good Rod · Lv 10
- Safari Zone (middle)Fishing with a Good Rod · Lv 10
- Seafoam Islands (B3F)Fishing with a Good Rod, Fishing with a Super Rod · Lv 10–15
- Seafoam Islands (B4F)Fishing with a Good Rod, Fishing with a Super Rod · Lv 10–15
- Vermilion CityFishing with a Good Rod · Lv 10
- Viridian CityFishing with a Good Rod · Lv 10
Sword: The Isle of Armor 4 areas
- Courageous Cavern (Max Den E)Catch a wild Dynamax or Gigantamax Pokémon in a Max Raid battle. · Lv 25–40
- Fields of Honor (Max Den G)Catch a wild Dynamax or Gigantamax Pokémon in a Max Raid battle. · Lv 25–40
- Forest of FocusFishing at bubbling spots in the water · Lv 13–60
- Soothing Wetlands (Max Den I)Catch a wild Dynamax or Gigantamax Pokémon in a Max Raid battle. · Lv 25–40
Shield 9 areas
- Bridge FieldSurfing in the overworld · Lv 40–60
- East Lake AxewellFishing at bubbling spots in the water, Surfing in the overworld · Lv 8–60
- Giant's Cap (Main Area)Fishing at bubbling spots in the water · Lv 26–60
- North Lake MilochSurfing in the overworld · Lv 42–60
- Route 4Fishing at bubbling spots in the water · Lv 13–15
- Route 5Fishing at bubbling spots in the water · Lv 16–18
- Route 6Fishing at bubbling spots in the water · Lv 28–30
- South Lake Miloch (Main Area)Surfing in the overworld · Lv 41–60
- West Lake AxewellFishing at bubbling spots in the water, Surfing in the overworld · Lv 7–60
Sword 9 areas
- Bridge FieldSurfing in the overworld · Lv 40–60
- East Lake AxewellFishing at bubbling spots in the water, Surfing in the overworld · Lv 8–60
- Giant's Cap (Main Area)Fishing at bubbling spots in the water · Lv 26–60
- North Lake MilochSurfing in the overworld · Lv 42–60
- Route 4Fishing at bubbling spots in the water · Lv 13–15
- Route 5Fishing at bubbling spots in the water · Lv 16–18
- Route 6Fishing at bubbling spots in the water · Lv 28–30
- South Lake Miloch (Main Area)Surfing in the overworld · Lv 41–60
- West Lake AxewellFishing at bubbling spots in the water, Surfing in the overworld · Lv 7–60
Let’s Go, Eevee! 1 area
- Road 6Surfing in the overworld · Lv 11–16
Let’s Go, Pikachu! 1 area
- Road 6Surfing in the overworld · Lv 11–16
Ultra Moon 2 areas
- Brooklet HillFishing at bubbling spots in the water, Fishing with a Super Rod · Lv 10–21
- Malie GardenFishing at bubbling spots in the water, Fishing with a Super Rod · Lv 10–33
Ultra Sun 2 areas
- Brooklet HillFishing at bubbling spots in the water, Fishing with a Super Rod · Lv 10–21
- Malie GardenFishing at bubbling spots in the water, Fishing with a Super Rod · Lv 10–33
Moon 2 areas
- Brooklet HillFishing at bubbling spots in the water, Fishing with a Super Rod · Lv 10–15
- Malie GardenFishing with a Super Rod · Lv 10–27
Sun 2 areas
- Brooklet HillFishing at bubbling spots in the water, Fishing with a Super Rod · Lv 10–15
- Malie GardenFishing with a Super Rod · Lv 10–27
Y 3 areas
- Parfum PalaceFishing with a Good Rod · Lv 25
- Road 22Fishing with a Good Rod · Lv 25
- Road 3Fishing with a Good Rod · Lv 25
X 3 areas
- Parfum PalaceFishing with a Good Rod · Lv 25
- Road 22Fishing with a Good Rod · Lv 25
- Road 3Fishing with a Good Rod · Lv 25
White 2 8 areas
- Abundant ShrineFishing in dark spots, Fishing with a Super Rod · Lv 40–70
- Aspertia CityFishing in dark spots, Fishing with a Super Rod · Lv 40–70
- Pinwheel Forest (inside)Fishing in dark spots, Fishing with a Super Rod · Lv 35–70
- Road 11Fishing in dark spots, Fishing with a Super Rod · Lv 40–70
- Road 14Fishing in dark spots, Fishing with a Super Rod · Lv 40–70
- Road 22Fishing in dark spots, Fishing with a Super Rod · Lv 40–70
- Road 3Fishing in dark spots, Fishing with a Super Rod · Lv 40–70
- Striaton CityFishing in dark spots, Fishing with a Super Rod · Lv 40–70
Black 2 8 areas
- Abundant ShrineFishing in dark spots, Fishing with a Super Rod · Lv 40–70
- Aspertia CityFishing in dark spots, Fishing with a Super Rod · Lv 40–70
- Pinwheel Forest (inside)Fishing in dark spots, Fishing with a Super Rod · Lv 35–70
- Road 11Fishing in dark spots, Fishing with a Super Rod · Lv 40–60
- Road 14Fishing in dark spots, Fishing with a Super Rod · Lv 40–70
- Road 22Fishing in dark spots, Fishing with a Super Rod · Lv 40–70
- Road 3Fishing in dark spots, Fishing with a Super Rod · Lv 40–70
- Striaton CityFishing in dark spots, Fishing with a Super Rod · Lv 40–70
White 7 areas
- Abundant ShrineFishing in dark spots, Fishing with a Super Rod · Lv 35–60
- Lostlorn ForestFishing in dark spots, Fishing with a Super Rod · Lv 35–70
- Pinwheel Forest (inside)Fishing in dark spots, Fishing with a Super Rod · Lv 35–60
- Road 11Fishing in dark spots, Fishing with a Super Rod · Lv 35–60
- Road 14Fishing in dark spots, Fishing with a Super Rod · Lv 35–60
- Road 3Fishing in dark spots, Fishing with a Super Rod · Lv 35–60
- Striaton CityFishing in dark spots, Fishing with a Super Rod · Lv 35–60
Black 7 areas
- Abundant ShrineFishing in dark spots, Fishing with a Super Rod · Lv 35–60
- Lostlorn ForestFishing in dark spots, Fishing with a Super Rod · Lv 35–70
- Pinwheel Forest (inside)Fishing in dark spots, Fishing with a Super Rod · Lv 35–60
- Road 11Fishing in dark spots, Fishing with a Super Rod · Lv 35–60
- Road 14Fishing in dark spots, Fishing with a Super Rod · Lv 35–60
- Road 3Fishing in dark spots, Fishing with a Super Rod · Lv 35–60
- Striaton CityFishing in dark spots, Fishing with a Super Rod · Lv 35–60
SoulSilver 28 areas
- Cerulean Cave (1F)Fishing with a Good Rod · Lv 20
- Cerulean Cave (2F)Fishing with a Good Rod · Lv 20
- Cerulean Cave (B1F)Fishing with a Good Rod · Lv 20
- Cerulean CityFishing with a Good Rod, Fishing with a Super Rod, Fishing with an Old Rod, Surfing · Lv 5–40
- Dark Cave (Blackthorn City entrance)Fishing with a Good Rod, Fishing with a Super Rod, Fishing with an Old Rod · Lv 10–40
- Dark Cave (Violet City entrance)Fishing with a Good Rod, Fishing with a Super Rod, Fishing with an Old Rod · Lv 10–40
- Mount Mortar (1F)Fishing with a Good Rod, Fishing with a Super Rod, Fishing with an Old Rod, Surfing · Lv 10–40
- Mount Mortar (B1F)Fishing with a Good Rod, Fishing with a Super Rod, Fishing with an Old Rod, Surfing · Lv 10–40
- Mount Mortar (Upper Cave)Fishing with a Good Rod, Fishing with a Super Rod, Fishing with an Old Rod, Surfing · Lv 10–40
- Mount Silver (1F top)Fishing with a Good Rod, Fishing with a Super Rod, Fishing with an Old Rod, Surfing · Lv 10–40
- Mount Silver (1F)Fishing with a Good Rod, Fishing with an Old Rod, Surfing · Lv 10–40
- Mount Silver (2F)Fishing with a Good Rod, Fishing with a Super Rod, Fishing with an Old Rod, Surfing · Lv 10–40
- Mount Silver (4F)Fishing with a Good Rod, Fishing with a Super Rod, Fishing with an Old Rod, Surfing · Lv 10–40
- Mount Silver (top)Fishing with a Good Rod, Fishing with a Super Rod, Fishing with an Old Rod, Surfing · Lv 10–40
- Road 10Fishing with a Good Rod, Fishing with a Super Rod, Fishing with an Old Rod, Surfing · Lv 10–40
- Road 24Fishing with a Good Rod, Fishing with a Super Rod, Fishing with an Old Rod, Surfing · Lv 5–40
- Road 25Fishing with a Good Rod, Fishing with a Super Rod, Fishing with an Old Rod, Surfing · Lv 5–40
- Road 4Fishing with a Good Rod, Fishing with a Super Rod, Fishing with an Old Rod, Surfing · Lv 5–40
- Road 42Fishing with a Good Rod, Fishing with a Super Rod, Fishing with an Old Rod, Surfing · Lv 10–40
- Road 9Fishing with a Good Rod, Fishing with a Super Rod, Fishing with an Old Rod, Surfing · Lv 10–40
- Safari Zone Rocky BeachFishing with a Good Rod, Fishing with a Super Rod, Fishing with an Old Rod · Lv 13–38
- Safari Zone SwampFishing with a Good Rod, Fishing with a Super Rod, Fishing with an Old Rod, Surfing · Lv 15–37
- Slowpoke Well (1F)Fishing with a Good Rod, Fishing with a Super Rod, Fishing with an Old Rod · Lv 10–40
- Slowpoke Well (B1F)Fishing with a Good Rod, Fishing with a Super Rod, Fishing with an Old Rod · Lv 10–40
- Tohjo FallsFishing with a Good Rod, Fishing with a Super Rod, Fishing with an Old Rod, Surfing · Lv 10–40
- Union Cave (1F)Fishing with a Good Rod, Fishing with a Super Rod, Fishing with an Old Rod · Lv 10–40
- Union Cave (B1F)Fishing with a Good Rod, Fishing with a Super Rod, Fishing with an Old Rod · Lv 10–40
- Unknown Area; all RattataFishing with a Good Rod, Fishing with a Super Rod, Fishing with an Old Rod · Lv 10–20
HeartGold 28 areas
- Cerulean Cave (1F)Fishing with a Good Rod · Lv 20
- Cerulean Cave (2F)Fishing with a Good Rod · Lv 20
- Cerulean Cave (B1F)Fishing with a Good Rod · Lv 20
- Cerulean CityFishing with a Good Rod, Fishing with a Super Rod, Fishing with an Old Rod, Surfing · Lv 5–40
- Dark Cave (Blackthorn City entrance)Fishing with a Good Rod, Fishing with a Super Rod, Fishing with an Old Rod · Lv 10–40
- Dark Cave (Violet City entrance)Fishing with a Good Rod, Fishing with a Super Rod, Fishing with an Old Rod · Lv 10–40
- Mount Mortar (1F)Fishing with a Good Rod, Fishing with a Super Rod, Fishing with an Old Rod, Surfing · Lv 10–40
- Mount Mortar (B1F)Fishing with a Good Rod, Fishing with a Super Rod, Fishing with an Old Rod, Surfing · Lv 10–40
- Mount Mortar (Upper Cave)Fishing with a Good Rod, Fishing with a Super Rod, Fishing with an Old Rod, Surfing · Lv 10–40
- Mount Silver (1F top)Fishing with a Good Rod, Fishing with a Super Rod, Fishing with an Old Rod, Surfing · Lv 10–40
- Mount Silver (1F)Fishing with a Good Rod, Fishing with an Old Rod, Surfing · Lv 10–40
- Mount Silver (2F)Fishing with a Good Rod, Fishing with a Super Rod, Fishing with an Old Rod, Surfing · Lv 10–40
- Mount Silver (4F)Fishing with a Good Rod, Fishing with a Super Rod, Fishing with an Old Rod, Surfing · Lv 10–40
- Mount Silver (top)Fishing with a Good Rod, Fishing with a Super Rod, Fishing with an Old Rod, Surfing · Lv 10–40
- Road 10Fishing with a Good Rod, Fishing with a Super Rod, Fishing with an Old Rod, Surfing · Lv 10–40
- Road 24Fishing with a Good Rod, Fishing with a Super Rod, Fishing with an Old Rod, Surfing · Lv 5–40
- Road 25Fishing with a Good Rod, Fishing with a Super Rod, Fishing with an Old Rod, Surfing · Lv 5–40
- Road 4Fishing with a Good Rod, Fishing with a Super Rod, Fishing with an Old Rod, Surfing · Lv 5–40
- Road 42Fishing with a Good Rod, Fishing with a Super Rod, Fishing with an Old Rod, Surfing · Lv 10–40
- Road 9Fishing with a Good Rod, Fishing with a Super Rod, Fishing with an Old Rod, Surfing · Lv 10–40
- Safari Zone Rocky BeachFishing with a Good Rod, Fishing with a Super Rod, Fishing with an Old Rod · Lv 13–38
- Safari Zone SwampFishing with a Good Rod, Fishing with a Super Rod, Fishing with an Old Rod, Surfing · Lv 15–37
- Slowpoke Well (1F)Fishing with a Good Rod, Fishing with a Super Rod, Fishing with an Old Rod · Lv 10–40
- Slowpoke Well (B1F)Fishing with a Good Rod, Fishing with a Super Rod, Fishing with an Old Rod · Lv 10–40
- Tohjo FallsFishing with a Good Rod, Fishing with a Super Rod, Fishing with an Old Rod, Surfing · Lv 10–40
- Union Cave (1F)Fishing with a Good Rod, Fishing with a Super Rod, Fishing with an Old Rod · Lv 10–40
- Union Cave (B1F)Fishing with a Good Rod, Fishing with a Super Rod, Fishing with an Old Rod · Lv 10–40
- Unknown Area; all RattataFishing with a Good Rod, Fishing with a Super Rod, Fishing with an Old Rod · Lv 10–20
Platinum 15 areas
- Celestic TownFishing with a Good Rod · Lv 15–35
- Lake AcuityFishing with a Good Rod · Lv 15–20
- Lake ValorFishing with a Good Rod · Lv 15–20
- Lake Verity (after Galactic intervention)Fishing with a Good Rod · Lv 15–20
- Lake Verity (before Galactic intervention)Fishing with a Good Rod · Lv 15–20
- Road 203Fishing with a Good Rod · Lv 10–25
- Road 204 (north, towards Floaroma Town)Fishing with a Good Rod · Lv 10–25
- Road 204 (south, towards Jubilife City)Fishing with a Good Rod · Lv 10–25
- Road 208Fishing with a Good Rod · Lv 10–25
- Road 209Fishing with a Good Rod · Lv 10–25
- Road 212 (north, towards Hearthome City)Fishing with a Good Rod · Lv 10–25
- Road 214Fishing with a Good Rod · Lv 10–25
- Road 229Fishing with a Good Rod · Lv 10–25
- Sendoff SpringFishing with a Good Rod · Lv 10–25
- Twinleaf TownFishing with a Good Rod · Lv 15–35
Pearl 13 areas
- Lake AcuityFishing with a Good Rod · Lv 10–25
- Lake ValorFishing with a Good Rod · Lv 10–25
- Lake Verity (after Galactic intervention)Fishing with a Good Rod · Lv 10–25
- Lake Verity (before Galactic intervention)Fishing with a Good Rod · Lv 10–25
- Resort AreaFishing with a Good Rod · Lv 10–25
- Road 203Fishing with a Good Rod · Lv 10–25
- Road 204 (north, towards Floaroma Town)Fishing with a Good Rod · Lv 10–25
- Road 204 (south, towards Jubilife City)Fishing with a Good Rod · Lv 10–25
- Road 209Fishing with a Good Rod · Lv 10–25
- Road 212 (north, towards Hearthome City)Fishing with a Good Rod · Lv 10–25
- Road 214Fishing with a Good Rod · Lv 10–25
- Sendoff SpringFishing with a Good Rod · Lv 10–25
- Twinleaf TownFishing with a Good Rod · Lv 10–25
Diamond 13 areas
- Lake AcuityFishing with a Good Rod · Lv 10–25
- Lake ValorFishing with a Good Rod · Lv 10–25
- Lake Verity (after Galactic intervention)Fishing with a Good Rod · Lv 10–25
- Lake Verity (before Galactic intervention)Fishing with a Good Rod · Lv 10–25
- Resort AreaFishing with a Good Rod · Lv 10–25
- Road 203Fishing with a Good Rod · Lv 10–25
- Road 204 (north, towards Floaroma Town)Fishing with a Good Rod · Lv 10–25
- Road 204 (south, towards Jubilife City)Fishing with a Good Rod · Lv 10–25
- Road 209Fishing with a Good Rod · Lv 10–25
- Road 212 (north, towards Hearthome City)Fishing with a Good Rod · Lv 10–25
- Road 214Fishing with a Good Rod · Lv 10–25
- Sendoff SpringFishing with a Good Rod · Lv 10–25
- Twinleaf TownFishing with a Good Rod · Lv 10–25
LeafGreen 17 areas
- Berry ForestFishing with a Good Rod, Fishing with a Super Rod · Lv 5–25
- Cape BrinkFishing with a Good Rod · Lv 5–15
- Cerulean Cave (1F)Fishing with a Good Rod · Lv 5–15
- Cerulean Cave (B1F)Fishing with a Good Rod · Lv 5–15
- Four IslandFishing with a Good Rod · Lv 5–15
- Fuchsia CityFishing with a Good Rod, Fishing with a Super Rod · Lv 5–25
- Icefall Cave (entrance)Fishing with a Good Rod · Lv 5–15
- Road 22Fishing with a Good Rod · Lv 5–15
- Road 23Fishing with a Good Rod · Lv 5–15
- Road 25Fishing with a Good Rod · Lv 5–15
- Road 6Fishing with a Good Rod · Lv 5–15
- Ruin ValleyFishing with a Good Rod · Lv 5–15
- Safari Zone (Area 1, east)Fishing with a Good Rod, Fishing with a Super Rod · Lv 5–25
- Safari Zone (Area 2, north)Fishing with a Good Rod, Fishing with a Super Rod · Lv 5–25
- Safari Zone (Area 3, west)Fishing with a Good Rod, Fishing with a Super Rod · Lv 5–25
- Safari Zone (middle)Fishing with a Good Rod, Fishing with a Super Rod · Lv 5–25
- Viridian CityFishing with a Good Rod · Lv 5–15
FireRed 17 areas
- Berry ForestFishing with a Good Rod, Fishing with a Super Rod · Lv 5–25
- Cape BrinkFishing with a Good Rod · Lv 5–15
- Cerulean Cave (1F)Fishing with a Good Rod · Lv 5–15
- Cerulean Cave (B1F)Fishing with a Good Rod · Lv 5–15
- Four IslandFishing with a Good Rod · Lv 5–15
- Fuchsia CityFishing with a Good Rod, Fishing with a Super Rod · Lv 5–25
- Icefall Cave (entrance)Fishing with a Good Rod · Lv 5–15
- Road 22Fishing with a Good Rod · Lv 5–15
- Road 23Fishing with a Good Rod · Lv 5–15
- Road 25Fishing with a Good Rod · Lv 5–15
- Road 6Fishing with a Good Rod · Lv 5–15
- Ruin ValleyFishing with a Good Rod · Lv 5–15
- Safari Zone (Area 1, east)Fishing with a Good Rod, Fishing with a Super Rod · Lv 5–25
- Safari Zone (Area 2, north)Fishing with a Good Rod, Fishing with a Super Rod · Lv 5–25
- Safari Zone (Area 3, west)Fishing with a Good Rod, Fishing with a Super Rod · Lv 5–25
- Safari Zone (middle)Fishing with a Good Rod, Fishing with a Super Rod · Lv 5–25
- Viridian CityFishing with a Good Rod · Lv 5–15
Emerald 14 areas
- Meteor FallsFishing with a Good Rod, Fishing with an Old Rod · Lv 5–30
- Meteor Falls (B1F)Fishing with a Good Rod, Fishing with an Old Rod · Lv 5–30
- Meteor Falls (back)Fishing with a Good Rod, Fishing with an Old Rod · Lv 5–30
- Meteor Falls (back/small room)Fishing with a Good Rod, Fishing with an Old Rod · Lv 5–30
- Petalburg CityFishing with a Good Rod, Fishing with an Old Rod · Lv 5–30
- Road 102Fishing with a Good Rod, Fishing with an Old Rod, Surfing · Lv 5–30
- Road 111Fishing with a Good Rod, Fishing with an Old Rod, Surfing · Lv 5–30
- Road 114Fishing with a Good Rod, Fishing with an Old Rod, Surfing · Lv 5–30
- Road 117Fishing with a Good Rod, Fishing with an Old Rod, Surfing · Lv 5–30
- Road 120Fishing with a Good Rod, Fishing with an Old Rod, Surfing · Lv 5–30
- Safari Zone (NW/mach bike area)Fishing with a Good Rod, Fishing with a Super Rod, Fishing with an Old Rod · Lv 5–35
- Safari Zone (SW)Fishing with a Good Rod, Fishing with a Super Rod, Fishing with an Old Rod · Lv 5–35
- Safari Zone (expansion south)Fishing with a Good Rod, Fishing with a Super Rod, Fishing with an Old Rod · Lv 25–30
- Victory Road (B2F)Fishing with a Good Rod, Fishing with an Old Rod · Lv 5–30
Sapphire 13 areas
- Meteor FallsFishing with a Good Rod, Fishing with an Old Rod · Lv 5–30
- Meteor Falls (B1F)Fishing with a Good Rod, Fishing with an Old Rod · Lv 5–30
- Meteor Falls (back)Fishing with a Good Rod, Fishing with an Old Rod · Lv 5–30
- Meteor Falls (back/small room)Fishing with a Good Rod, Fishing with an Old Rod · Lv 5–30
- Petalburg CityFishing with a Good Rod, Fishing with an Old Rod · Lv 5–30
- Road 102Fishing with a Good Rod, Fishing with an Old Rod · Lv 5–30
- Road 111Fishing with a Good Rod, Fishing with an Old Rod · Lv 5–30
- Road 114Fishing with a Good Rod, Fishing with an Old Rod · Lv 5–30
- Road 117Fishing with a Good Rod, Fishing with an Old Rod · Lv 5–30
- Road 120Fishing with a Good Rod, Fishing with an Old Rod · Lv 5–30
- Safari Zone (NW/mach bike area)Fishing with a Good Rod, Fishing with a Super Rod, Fishing with an Old Rod · Lv 5–35
- Safari Zone (SW)Fishing with a Good Rod, Fishing with a Super Rod, Fishing with an Old Rod · Lv 5–35
- Victory Road (B2F)Fishing with a Good Rod, Fishing with an Old Rod · Lv 5–30
Ruby 13 areas
- Meteor FallsFishing with a Good Rod, Fishing with an Old Rod · Lv 5–30
- Meteor Falls (B1F)Fishing with a Good Rod, Fishing with an Old Rod · Lv 5–30
- Meteor Falls (back)Fishing with a Good Rod, Fishing with an Old Rod · Lv 5–30
- Meteor Falls (back/small room)Fishing with a Good Rod, Fishing with an Old Rod · Lv 5–30
- Petalburg CityFishing with a Good Rod, Fishing with an Old Rod · Lv 5–30
- Road 102Fishing with a Good Rod, Fishing with an Old Rod · Lv 5–30
- Road 111Fishing with a Good Rod, Fishing with an Old Rod · Lv 5–30
- Road 114Fishing with a Good Rod, Fishing with an Old Rod · Lv 5–30
- Road 117Fishing with a Good Rod, Fishing with an Old Rod · Lv 5–30
- Road 120Fishing with a Good Rod, Fishing with an Old Rod · Lv 5–30
- Safari Zone (NW/mach bike area)Fishing with a Good Rod, Fishing with a Super Rod, Fishing with an Old Rod · Lv 5–35
- Safari Zone (SW)Fishing with a Good Rod, Fishing with a Super Rod, Fishing with an Old Rod · Lv 5–35
- Victory Road (B2F)Fishing with a Good Rod, Fishing with an Old Rod · Lv 5–30
Crystal 18 areas
- Cerulean CityFishing with a Good Rod, Fishing with a Super Rod, Fishing with an Old Rod, Surfing · Lv 5–40
- Dark Cave (Blackthorn City entrance)Fishing with a Good Rod, Fishing with a Super Rod, Fishing with an Old Rod · Lv 10–40
- Dark Cave (Violet City entrance)Fishing with a Good Rod, Fishing with a Super Rod, Fishing with an Old Rod · Lv 10–40
- Mount Mortar (1F)Fishing with a Good Rod, Fishing with a Super Rod, Fishing with an Old Rod, Surfing · Lv 10–40
- Mount Mortar (B1F)Fishing with a Good Rod, Fishing with a Super Rod, Fishing with an Old Rod, Surfing · Lv 10–40
- Mount Mortar (Upper Cave)Fishing with a Good Rod, Fishing with a Super Rod, Fishing with an Old Rod, Surfing · Lv 10–40
- Mount Silver (2F)Fishing with a Good Rod, Fishing with a Super Rod, Fishing with an Old Rod, Surfing · Lv 10–40
- Road 10Fishing with a Good Rod, Fishing with a Super Rod, Fishing with an Old Rod, Surfing · Lv 10–40
- Road 24Fishing with a Good Rod, Fishing with a Super Rod, Fishing with an Old Rod, Surfing · Lv 4–40
- Road 25Fishing with a Good Rod, Fishing with a Super Rod, Fishing with an Old Rod, Surfing · Lv 4–40
- Road 4Surfing · Lv 5–14
- Road 42Fishing with a Good Rod, Fishing with a Super Rod, Fishing with an Old Rod, Surfing · Lv 10–40
- Road 9Fishing with a Good Rod, Fishing with a Super Rod, Fishing with an Old Rod, Surfing · Lv 10–40
- Slowpoke Well (1F)Fishing with a Good Rod, Fishing with a Super Rod, Fishing with an Old Rod · Lv 10–40
- Slowpoke Well (B1F)Fishing with a Good Rod, Fishing with a Super Rod, Fishing with an Old Rod · Lv 10–40
- Tohjo FallsFishing with a Good Rod, Fishing with a Super Rod, Fishing with an Old Rod, Surfing · Lv 10–40
- Union Cave (1F)Fishing with a Good Rod, Fishing with a Super Rod, Fishing with an Old Rod · Lv 10–40
- Union Cave (B1F)Fishing with a Good Rod, Fishing with a Super Rod, Fishing with an Old Rod · Lv 10–40
Silver 18 areas
- Cerulean CityFishing with a Good Rod, Fishing with a Super Rod, Fishing with an Old Rod, Surfing · Lv 5–40
- Dark Cave (Blackthorn City entrance)Fishing with a Good Rod, Fishing with a Super Rod, Fishing with an Old Rod · Lv 10–40
- Dark Cave (Violet City entrance)Fishing with a Good Rod, Fishing with a Super Rod, Fishing with an Old Rod · Lv 10–40
- Mount Mortar (1F)Fishing with a Good Rod, Fishing with a Super Rod, Fishing with an Old Rod, Surfing · Lv 10–40
- Mount Mortar (B1F)Fishing with a Good Rod, Fishing with a Super Rod, Fishing with an Old Rod, Surfing · Lv 10–40
- Mount Mortar (Upper Cave)Fishing with a Good Rod, Fishing with a Super Rod, Fishing with an Old Rod, Surfing · Lv 10–40
- Mount Silver (2F)Fishing with a Good Rod, Fishing with a Super Rod, Fishing with an Old Rod, Surfing · Lv 10–40
- Road 10Fishing with a Good Rod, Fishing with a Super Rod, Fishing with an Old Rod, Surfing · Lv 10–40
- Road 24Fishing with a Good Rod, Fishing with a Super Rod, Fishing with an Old Rod, Surfing · Lv 4–40
- Road 25Fishing with a Good Rod, Fishing with a Super Rod, Fishing with an Old Rod, Surfing · Lv 4–40
- Road 4Surfing · Lv 5–14
- Road 42Fishing with a Good Rod, Fishing with a Super Rod, Fishing with an Old Rod, Surfing · Lv 10–40
- Road 9Fishing with a Good Rod, Fishing with a Super Rod, Fishing with an Old Rod, Surfing · Lv 10–40
- Slowpoke Well (1F)Fishing with a Good Rod, Fishing with a Super Rod, Fishing with an Old Rod · Lv 10–40
- Slowpoke Well (B1F)Fishing with a Good Rod, Fishing with a Super Rod, Fishing with an Old Rod · Lv 10–40
- Tohjo FallsFishing with a Good Rod, Fishing with a Super Rod, Fishing with an Old Rod, Surfing · Lv 10–40
- Union Cave (1F)Fishing with a Good Rod, Fishing with a Super Rod, Fishing with an Old Rod · Lv 10–40
- Union Cave (B1F)Fishing with a Good Rod, Fishing with a Super Rod, Fishing with an Old Rod · Lv 10–40
Gold 18 areas
- Cerulean CityFishing with a Good Rod, Fishing with a Super Rod, Fishing with an Old Rod, Surfing · Lv 5–40
- Dark Cave (Blackthorn City entrance)Fishing with a Good Rod, Fishing with a Super Rod, Fishing with an Old Rod · Lv 10–40
- Dark Cave (Violet City entrance)Fishing with a Good Rod, Fishing with a Super Rod, Fishing with an Old Rod · Lv 10–40
- Mount Mortar (1F)Fishing with a Good Rod, Fishing with a Super Rod, Fishing with an Old Rod, Surfing · Lv 10–40
- Mount Mortar (B1F)Fishing with a Good Rod, Fishing with a Super Rod, Fishing with an Old Rod, Surfing · Lv 10–40
- Mount Mortar (Upper Cave)Fishing with a Good Rod, Fishing with a Super Rod, Fishing with an Old Rod, Surfing · Lv 10–40
- Mount Silver (2F)Fishing with a Good Rod, Fishing with a Super Rod, Fishing with an Old Rod, Surfing · Lv 10–40
- Road 10Fishing with a Good Rod, Fishing with a Super Rod, Fishing with an Old Rod, Surfing · Lv 10–40
- Road 24Fishing with a Good Rod, Fishing with a Super Rod, Fishing with an Old Rod, Surfing · Lv 4–40
- Road 25Fishing with a Good Rod, Fishing with a Super Rod, Fishing with an Old Rod, Surfing · Lv 4–40
- Road 4Surfing · Lv 5–14
- Road 42Fishing with a Good Rod, Fishing with a Super Rod, Fishing with an Old Rod, Surfing · Lv 10–40
- Road 9Fishing with a Good Rod, Fishing with a Super Rod, Fishing with an Old Rod, Surfing · Lv 10–40
- Slowpoke Well (1F)Fishing with a Good Rod, Fishing with a Super Rod, Fishing with an Old Rod · Lv 10–40
- Slowpoke Well (B1F)Fishing with a Good Rod, Fishing with a Super Rod, Fishing with an Old Rod · Lv 10–40
- Tohjo FallsFishing with a Good Rod, Fishing with a Super Rod, Fishing with an Old Rod, Surfing · Lv 10–40
- Union Cave (1F)Fishing with a Good Rod, Fishing with a Super Rod, Fishing with an Old Rod · Lv 10–40
- Union Cave (B1F)Fishing with a Good Rod, Fishing with a Super Rod, Fishing with an Old Rod · Lv 10–40
Yellow 29 areas
- Celadon CityFishing with a Good Rod, Fishing with a Super Rod · Lv 5–20
- Cerulean Cave (1F)Fishing with a Good Rod, Fishing with a Super Rod · Lv 10–25
- Cerulean Cave (B1F)Fishing with a Good Rod, Fishing with a Super Rod · Lv 10–30
- Cerulean CityFishing with a Good Rod, Fishing with a Super Rod · Lv 10–30
- Cinnabar IslandFishing with a Good Rod · Lv 10
- Fuchsia CityFishing with a Good Rod · Lv 10
- Pallet TownFishing with a Good Rod · Lv 10
- Road 10Fishing with a Good Rod · Lv 10
- Road 11Fishing with a Good Rod · Lv 10
- Road 12Fishing with a Good Rod · Lv 10
- Road 13Fishing with a Good Rod · Lv 10
- Road 17Fishing with a Good Rod · Lv 10
- Road 18Fishing with a Good Rod · Lv 10
- Road 19Fishing with a Good Rod · Lv 10
- Road 20Fishing with a Good Rod · Lv 10
- Road 21Fishing with a Good Rod · Lv 10
- Road 22Fishing with a Good Rod · Lv 10
- Road 23Fishing with a Good Rod · Lv 10
- Road 24Fishing with a Good Rod, Fishing with a Super Rod · Lv 10–30
- Road 25Fishing with a Good Rod · Lv 10
- Road 6Fishing with a Good Rod, Fishing with a Super Rod · Lv 5–20
- Safari Zone (Area 1, east)Fishing with a Good Rod · Lv 10
- Safari Zone (Area 2, north)Fishing with a Good Rod · Lv 10
- Safari Zone (Area 3, west)Fishing with a Good Rod · Lv 10
- Safari Zone (middle)Fishing with a Good Rod · Lv 10
- Seafoam Islands (B3F)Fishing with a Good Rod · Lv 10
- Seafoam Islands (B4F)Fishing with a Good Rod · Lv 10
- Vermilion CityFishing with a Good Rod · Lv 10
- Viridian CityFishing with a Good Rod · Lv 10
Blue 30 areas
- Celadon CityFishing with a Good Rod · Lv 10
- Cerulean Cave (1F)Fishing with a Good Rod · Lv 10
- Cerulean Cave (B1F)Fishing with a Good Rod · Lv 10
- Cerulean CityFishing with a Good Rod, Fishing with a Super Rod · Lv 10–15
- Cinnabar IslandFishing with a Good Rod, Fishing with a Super Rod · Lv 10–15
- Fuchsia CityFishing with a Good Rod, Fishing with a Super Rod · Lv 10–15
- Pallet TownFishing with a Good Rod · Lv 10
- Road 10Fishing with a Good Rod · Lv 10
- Road 11Fishing with a Good Rod · Lv 10
- Road 12Fishing with a Good Rod, Fishing with a Super Rod · Lv 10–15
- Road 13Fishing with a Good Rod, Fishing with a Super Rod · Lv 10–15
- Road 17Fishing with a Good Rod, Fishing with a Super Rod · Lv 10–15
- Road 18Fishing with a Good Rod, Fishing with a Super Rod · Lv 10–15
- Road 19Fishing with a Good Rod, Fishing with a Super Rod · Lv 10–15
- Road 20Fishing with a Good Rod, Fishing with a Super Rod · Lv 10–15
- Road 21Fishing with a Good Rod, Fishing with a Super Rod · Lv 10–15
- Road 22Fishing with a Good Rod, Fishing with a Super Rod · Lv 10–15
- Road 23Fishing with a Good Rod · Lv 10
- Road 24Fishing with a Good Rod, Fishing with a Super Rod · Lv 10–15
- Road 25Fishing with a Good Rod, Fishing with a Super Rod · Lv 10–15
- Road 6Fishing with a Good Rod · Lv 10
- S.S. Anne dockFishing with a Good Rod · Lv 10
- Safari Zone (Area 1, east)Fishing with a Good Rod · Lv 10
- Safari Zone (Area 2, north)Fishing with a Good Rod · Lv 10
- Safari Zone (Area 3, west)Fishing with a Good Rod · Lv 10
- Safari Zone (middle)Fishing with a Good Rod · Lv 10
- Seafoam Islands (B3F)Fishing with a Good Rod, Fishing with a Super Rod · Lv 10–15
- Seafoam Islands (B4F)Fishing with a Good Rod, Fishing with a Super Rod · Lv 10–15
- Vermilion CityFishing with a Good Rod · Lv 10
- Viridian CityFishing with a Good Rod · Lv 10
Red 30 areas
- Celadon CityFishing with a Good Rod · Lv 10
- Cerulean Cave (1F)Fishing with a Good Rod · Lv 10
- Cerulean Cave (B1F)Fishing with a Good Rod · Lv 10
- Cerulean CityFishing with a Good Rod, Fishing with a Super Rod · Lv 10–15
- Cinnabar IslandFishing with a Good Rod, Fishing with a Super Rod · Lv 10–15
- Fuchsia CityFishing with a Good Rod, Fishing with a Super Rod · Lv 10–15
- Pallet TownFishing with a Good Rod · Lv 10
- Road 10Fishing with a Good Rod · Lv 10
- Road 11Fishing with a Good Rod · Lv 10
- Road 12Fishing with a Good Rod, Fishing with a Super Rod · Lv 10–15
- Road 13Fishing with a Good Rod, Fishing with a Super Rod · Lv 10–15
- Road 17Fishing with a Good Rod, Fishing with a Super Rod · Lv 10–15
- Road 18Fishing with a Good Rod, Fishing with a Super Rod · Lv 10–15
- Road 19Fishing with a Good Rod, Fishing with a Super Rod · Lv 10–15
- Road 20Fishing with a Good Rod, Fishing with a Super Rod · Lv 10–15
- Road 21Fishing with a Good Rod, Fishing with a Super Rod · Lv 10–15
- Road 22Fishing with a Good Rod, Fishing with a Super Rod · Lv 10–15
- Road 23Fishing with a Good Rod · Lv 10
- Road 24Fishing with a Good Rod, Fishing with a Super Rod · Lv 10–15
- Road 25Fishing with a Good Rod, Fishing with a Super Rod · Lv 10–15
- Road 6Fishing with a Good Rod · Lv 10
- S.S. Anne dockFishing with a Good Rod · Lv 10
- Safari Zone (Area 1, east)Fishing with a Good Rod · Lv 10
- Safari Zone (Area 2, north)Fishing with a Good Rod · Lv 10
- Safari Zone (Area 3, west)Fishing with a Good Rod · Lv 10
- Safari Zone (middle)Fishing with a Good Rod · Lv 10
- Seafoam Islands (B3F)Fishing with a Good Rod, Fishing with a Super Rod · Lv 10–15
- Seafoam Islands (B4F)Fishing with a Good Rod, Fishing with a Super Rod · Lv 10–15
- Vermilion CityFishing with a Good Rod · Lv 10
- Viridian CityFishing with a Good Rod · Lv 10
Locations cover Red & Blue to Sword & Shield (with its DLC) and Let’s Go. We don’t have them yet for Legends: Arceus, Brilliant Diamond & Shining Pearl, Scarlet & Violet and Legends: Z-A.